How to change Drive\folder background?


Yeah! right, it actually is possible to change the background image of a drive or a folder.When I experimented it on Windows XP it worked on the first try.But When I tried this on Windows 7 it didn't worked even after a hundred times, but it finally worked with some miracle.


 So now I will guide you through all the process to set an image as background of a drive or folder.

For Windows XP

All you need to do is to perform some configuration, write some code and save it, make the computer process it automatically.And its very easy to do.Just follow the steps below:

1. Open Notepad.
2. Type the following exactly:

 [{BE098140-A513-11D0-A3A4-00C04FD706EC}]

3. Press enter to goto next line.
4.  Now we will give the location of the image.To do this type the following:
   
     iconarea_image=location of image 

For example, if the image is located somewhere outside the drive/folder whose background you want to set.For instance if the image is in the folder 'abc' in drive C, and the image name is img.jpg ;
     
      iconarea_image=C:\abc\img.jpg

Second example, if the image is in the same drive/folder whose background you want to change.For instance the drive is D ;
 
         iconarea_image=img.jpg

5. After giving the location, press enter to go to next line.
6. Now we are going to give the icon's text i-e its name, a color.By default the icon's text is black so if there is some problem in seeing the text you can follow this step, else just leave it. So to do this type following:

           iconarea_text=(color code in hexadecimal)  

You can use color any of your choice, but specify it in its hexadecimal code.Some of the codes are given below:
      White=0xFFFFFF
      Green=0x00FF00
      Blue=0xFF0000
      Purple=0xC000C0
      Red=0x0000FF
      Yellow=0x00FFFF
      Indigo=0xFFFF00
      Crimson=0xDC143C
      Deep pink=0xFF1493 

For example, if setting text colour to Red, the code will be:

        iconarea_text=0x0000FF

7. Now save the file as desktop.ini, in the drive or folder whose background you want to change.
And its all done! 

For Windows 7

 Manual method


So lets begin for Windows 7.Its a little bit hard, but similar.

1. Download and apply this registry tweak. To remove it use this.
2. Open Notepad, and type the following in the first line exactly:

        [AveFolder]

3. Press enter. In the next line we give the location of the image. The same rules apply as were of XP.

  IconArea_Image=location\address of image
 
4. Now type following, or just skip it:

ShadowedText=0
Recursive=0

5.Next we give the text colors. In Windows 7, you have to give a color combination of Red Green and Blue or RGB. A good color value would be between 1 and 255, the more near to 255 will make it brighter.Type the following:

TextR=(Red value)
TextG=(Green value)
TextB=(Blue value)

For example, the following will set the text color to bright red.

TextR=255
TextG=0
TextB=0

You can mix colors by trying different combinations.

6. Now save the file as desktop.ini in the drive or folder you want.And its all done!
Note: After applying the registry tweak, you may have to restart your computer.

Without Coding method

1. Download this, a software by WindowsClub. Or this one, by Ave's vista stuff.
2. Install any one of them.
3. Restart your computer.
4. And then use them.
Note: They may work or not 

Hope you like it!

What is JPEG ?

JPEG File format and Algorithm


JPEG stands for Joint Photographic Expert Group, the name of its creator.Its a file format for images or in other words an extension which you might have seen many times while dealing with your pictures as JPEG or JPG.
      In fact, it is an algorithm by most of the images are written or stored. JPEG, EXIF, JFIF and JPG are the common algorithms used by cameras, scanners and other imaging devices.The JPEG standard how an image is compressed into a stream of bytes and then decompressed  back to form an image.
   For example when a digital camera, a scanner, or any other device takes an image it first saves it as a raw image file and then converts it into a JPEG image.Usually the raw image has a size 2-6 time greater than a JPEG image, but when the raw image is processed through JPEG compression algorithms it has a low size.It can be very useful if you have a limited amount of memory.
            The JPEG image file format is almost universal.It is due to the fact that is being used in many devices, almost every imaging device, and also that it is compatible with 99% of image viewing applications and photo editing application.
         It has some advantages and disadvantages.

What actually is JPEG and its features?

 JPEG is an image format which is used to store images.It has a high compression ratio, but the compression ratio is variable.It usually achieves 10:1 ratio.The more the compression ratio is, the less will be the quality of the image.
     So if you want to experiment then open any image and save it as .png ,which is another image format with less compression.And check it's size.Then open again the original image and save it as jpeg or jpg.And note it's size, compare the sizes of both png and jpg images. Then you will learn the actual meaning of JPEG or image formats.You can also see the difference between the sizes of video files, such as a same video of same length will have less size in MP4 format than in AVI format.

  You can also try saving an image in jpg format with high compression and low compression and see the difference between their sizes and qualities.I have done that for you.
Highly compressed JPEG image
This is a JPEG image with high compression ratio.
It has a size of 17 KB.


While this JPEG image has low compression ratio.It has a size of 32.5KB.


Advantages of JPEG

  1. It is supported by almost all image related softwares and applications that includes image viewing and photo-editing applications, as it has been used for a long time and has spread world-wide.It was introduced in 1992 and is being used widely now.
  2. JPEG image files take less space which makes them ideal for storing and transferring images.
  3. JPEG file format is supported by every printer, so the users don't need to change the format before printing and can directly print from image viewing application or from camera.
  4. JPEG images are stored quickly by digital cameras and other imaging devices.Which has made it the default image format used by cameras and scanners so the users can take and store images quickly.

DisAdvantages of JPEG

  1. While saving images as JPEG some of the data of image is lost due to high compression, that it is why it is called lossy compression method.
  2. JPEG allows images to be saved consuming less space, but at the cost of quality and detail.That is why it is not good for images that are to be edited often, as some detail is lost while saving.
  3. It is not good at handling line drawings.
  4. Doesn't supports animation like .gif images.
  5. Doesn't supports transparency.
  6. Uses 8-bits for color data, with about 16.7 million colors.In contrast, modern cameras use 10 to 14 bits for colors. 
That would be all, Hope you like it!. Please leave any comments, suggestions or report any problem.

How to Change background image of Log-on Screen?

Change background image of Log-on Screen

This is the default background image of the screen what we call the Log-on screen, which is where you select user and enter password and then log-in to your account.And it is also the screen where you get the options like Lock this computer, Switch user, Log-off, Change password, and Start Task manager and others like ease of access etc, by pressing CTRL+ALT+DEL.

       In this article, I will show you how to set a custom background for log-on screen.There are various methods for doing it, but I will discuss only two best of them.One is, using a utility, for standard users.And the other is, manual method, for advanced user.


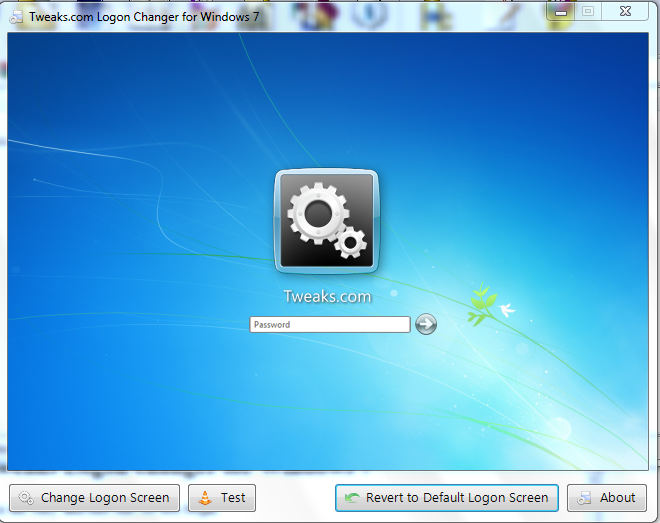
Using Tweaks Logon changer for Windows 7

This method is the easy and fast one.So lets begin.


  • Click on Change Logon Screen 
  •  Select any image, and open it or double click it.
  • If it asks that the image size is too large, then simply click on yes and it will adjust it.

Using manual method

 1). Locate the directory:                  C:\WINDOWS\System32\oobe\info
 2). Open it, you will see a folder named "backgrounds". If not then create one.
 3). Place any image you want to set as your logon background, but it must be a JPEG image or else it won't work.
 4). Rename that image and set its new name "backgrounddefault".
 5). Run this registry tweak
 6). Check to see if its working, just press ctrl+alt+delete to check.If its not working make sure that the name's spelling are correct and the image you used is JPEG.The JPEG is important.

How to take ownership of a system file?

Take ownership of a system file

In this article I will show you how you can get the ownership of a system file.A system file is usually a file with .dll extension.And by 'taking ownership', I mean that you get all permission for that file.

Procedure: 

Manual method (for advanced users):

1) First locate the file you want to take ownership of.
2) Right click on it.
3) Click on Properties.


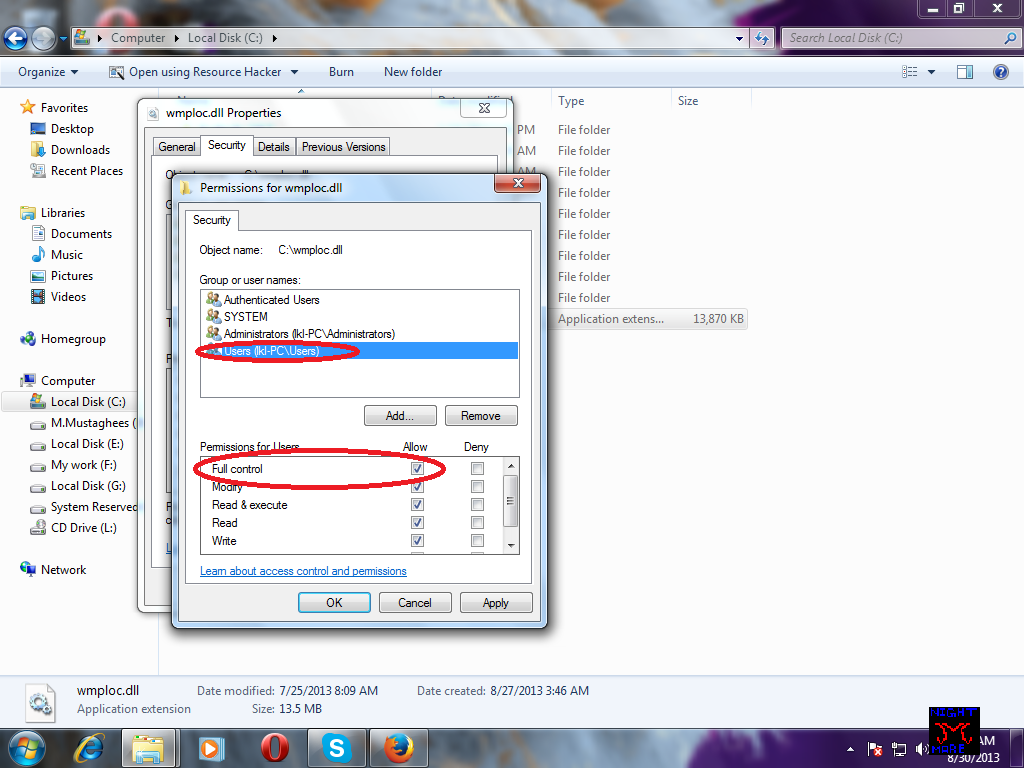
 4) Click on Security tab .
5) Click on Advanced button.
6) A new window will open, click on Owner tab.
7) Then click on Edit button.
8) A new window will open listing list of all users available.Select the user you want to set as the owner.
9) Then click on OK button.
10) Again click on OK.And come on the properties window.Click on OK.
11) Again open its properties.Go to Security tab Click on Edit button.
12) Click on Add button.Click on Advanced button.
13) Click on Find Now button.Find your user name in the list and then click OK button.
14) Get back to properties window.Select the new user (a new user name will appear i-e the one you added in last step).
15) Click on the check box next to Full control.Click on OK.

 Automatic method ( for standard users ) :

1) For this easy method you just need to download a file.Download it now.
2) Extract it.
3) And then run InstallTakeownership.reg.
It will add the required registry values.Now you will see that, if you right-click on any file, a new option "Take ownership" is there.
4) By clicking on it you will become the owner of that file.

 If Unable to replace

If you are unable to replace the file even after taking ownership of it, then the file might be in use with some other program.To replace, just move the original file to another location.
And then move your modified file to the original file's original location.  

And its all done !. Hope you like it.

How to change background image of Windows Media Player 12?

Change Background image of Windows Media player 12


In this article I will show that How you can change the Background Image of your Windows Media Player 12(WMP 12).Windows Media Player is included only in Windows 7, not in any of the previous versions.Although it is possible to change the background image of media player in the earlier version of Windows but it is not that easy, just a little bit harder.
   
         Its fun to do some editing and  your own customized things look more good( at least to yourself ).
 To start customizing Windows Media Player's background ,or if you are more creative you can even change the whole look of it, all you need is listed below:

 Indirect method for advanced users

Ingredients:
1) Windows 7 with WMP 12 installed.

2) A .dll editing software such as ResHacker, Resource tuner, Resource editor,etc.

That would be all, lets begin and good luck!
I will use resource tuner as it is easy to do with you may use any other, I had some problem doing it with ResHacker so I am not using it.To do it with the easy way if you are a standard user see the direct method at the end of article.

Instructions:

1) Find wmploc.dll and open it in Resource Tuner.The default location of wmploc.dll is C:\WINDOWS\System32.

2) Now , From the left pane, Click on and expand 257 and then find LIBRARY_BACKGROUND7.PNG .


3) Double click on LIBRARY_BACKGROUND7.PNG , a new window will open.All you have to do is to just select a new image that you want as your background image.

Click on the button with a folder image, just below your default( or the last image you customized) image.

4) Now select any image you want to be as your new Library background image.Then click on Open.
 5) If you are satisfied with it then go to file and then click on Save As. Name it wmploc, and save it with the extension .dll ( its important).Save it anywhere you want.
 6) Now you are nearly done with it.Just go to C:\WINDOWS\System32\ and replace it with the original one, if you want then you can also make a backup  of the original one.

Note : You may face some problems in replacing it with the original file because of the permissions, I mean that you won't have the permission ,by default, to replace it with the original.For most of the system file you don't have permission to edit or to do any thing to them.To learn more and find a solution visit this article.

 Direct method

If don't want to do any editing and just change the background directly, you can use some pre-edited wmplocs by me.
1) See the list below,
2) Download any of them
3) Extract and replace with original one.
Note : You may face some problems in replacing it with the original file because of the permissions, I mean that you won't have the permission ,by default, to replace it with the original.For most of the system file you don't have permission to edit or to do any thing to them.To learn more and find a solution visit this article.

  1. Lavendar flower.
  2. Kuai Huwai.
  3. Silt Colorado.
  4. Modern Warfare 2.
  5. Humpback Whale (dual image).
  6. Butterfly 1(dual image ).

What is DreamScene

   DreamScene 


    Microsoft Windows DreamScene was a feature included in the Ultimate version of Windows Vista.It was not included in any other version of Windows.It came as a part of Window Ultimate Extras, they were some optional features offered to the users of Windows vista.
   
         The basic job of this feature is to play a video as your Desktop background wallpaper.Moreover it also allows .gif images to be set as wallpaper.In case of Videos, it only allows .mpg and .wmv videos to be set as wallpaper.But users can also use their own  captured .avi videos by just altering the extension to .wmv.The latest version of DreamScene was released on September 25, 2007.
             Many people tried to use that feature in other versions of Windows.After a lot of tries, a tweak has been created which enables the same feature in other versions of Windows.If you also want to enable it in your Windows then you should visit this article.All it does is just copies some required files to your system folder and adds the required registry values.
 Here see a trailer of DreamScene :

     By default the sounds of the video being played as DreamScene are disabled, but with this fix you can enable them.
       
             Well there is another problem with it.And that is that the text of the icons on the desktop does not appears correctly if the DreamScene is enabled.But mostly where there is a problem there is a solution and here is the solution.

How to fix\enable sound in DreamScene

Fix\Enable Sounds in DreamScene


Windows DreamScene is a feature of Windows Vista Ultimate, which allows desktop background wallpaper to be set as a video.It is not included in any other version of Windows.But, with some registry and other tweaks this feature can be bringed in other versions of Windows.To enable it in other versions of Windows visit the previous article.
           By default sounds in Windows DreamScene are disabled.To enable the sounds of the video being played as DreamScene follow the procedure below:

Steps to enable sounds in DreamScene:

1) First set a video as your background wallpaper.

2) Click on the Speaker's icon on the right side of your taskbar.
3) Then click on "Mixer".
4) Windows DreamScene will be listed under Applications, and it will be muted by default.
5) All you need to do is to uncheck/unmute ,or click on, it.

And you are all done!!!
Please comment below and report any missing\broken links or some error\mistake in any article.

How to activate DreamScene

 How to activate DreamScene ?


The still desktop wallpaper might have bored you.In this article I will show how you can make your wallpaper a video using Windows feature called DreamScene.I will briefly tell you that what is Windows DreamScene, for detail on what is DreamScene then check this out.

          Well the DreamScene was a feature of Windows included in Windows Vista Ultimate, only Ultimate not any other, by which a user can make his desktop wallpaper a video.

So lets get started,
First of all you need to fulfill the requirements which are given below:
Requirements :
1) Windows 7.
2) Windows Aero ( activated)

3) A good Graphics adaptor ( minimum 256 MB), here is good list of them.
4) The software Win7 DreamScene activator.


Now if you have all requirements then follow the procedure:

Procedure:

1) Extract the archive.

2) Run the Windows7-DreamScene.exe file.
3) It will do all the important job itself and won't require any help from you.
4) Goto your desktop and right click on an empty area.
5) If Play DreamScene is listed then it has successfully been installed.


Now all you need is a video file which you can set as your background.You can use files of any size but they must be .wmv , .mpg. You can also use your own captured videos of .avi extension by just changing it extension to .wmv or .mpg.


You can find many more good quality dreamscenes here.

6) Right click on the Video file and click on Set as Background.
7) To stop or pause it right click on your desktop and click on Pause DreamScene.


 Defects

1) Sound is disabled by default. ( Fix it now )
2) The text of the icon on desktop does not appears correctly.
There are other possible ways you can set your desktop background a video such as using VLC media player.

That would be all, Hope you like it.And please leave your comments

Shutdown Windows

 Shutdown Windows with different styles!

Generally everyone who use Windows knows about its feature of Shutdown.
I mean to say that 99.9% people who use computers with Windows as OS know how to shutdown it.But it is the common way of shutting down, it usually clicking the shutdown button located in the start menu of start button.
        The question is that I know that everyone know about shutdown is then why I'm talking about it.
Actually the shutdown I'm talking about is not that comman one , but is a special one.In whick you can shutdown Windows with different styles.
      This technique comprises of using MS-DOS or Command prompt.
All you need is MS-DOS or Command prompt which are already integrated in Windows.

If you don't know how to open command prompt then 1) Click in start button, 2) Type "cmd.exe" in search box, or click on Run and then type "cmd.exe" and press enter.

There are many tricks I will show you.So lets start.

1) Shutting down using -s

Now type the following command:

                                            shutdown -s
This command will display a message that your computer will shutdown in less than a minute, or something like that.Then your computer will shutdown after 30 seconds.


2) Aborting shutdown with -a

This command will abort the shutdown operation, if any in progress.So after using -s then try -a (within 30 s).Now type :
               shutdown -a
A message will be displayed "log off was canceled", or something like that.


3) Shutting down by giving a time using -s -t


By default the shutdown time for -s is 30 s.To change this time you can use -t .
Now type:
      shutdown -s -t 25
You can replace 25 with any time you want.

4) Displaying a message before Shutting down using -c
This command will display a message before shutting down.Type the following:
                             shutdown -s -c "any text you want"
After hitting enter a window will appear with text in it.In addition you can also use -t with it.Type the following:
               shutdown -s -t 35 -c "its going to shutdown"
Note: Don't forget the single space between -c & the quotation marks(") .

5) Logging off using -l
Using this command will just log off the current user.Type:
                    shutdown -l

6) Opening the advanced shutdown dialog box using -i
This will show you the advanced dialog box with several options for shutting down windows and the functions which the above commands perform.Type:

                                                             shutdown -i
7)Shutdown all computers on a Network with -m

You will need the IP address of the computer on the network, or  the computer name.
To get the computer name:
1) Goto Control panel.
2) Goto System, then System or Properties.
3) You will see somewhere Computer Name.
After you get the Name type thee following:
                              shutdown -s -m \"IP  address (or) Computer name"

Replace  IP  address (or) Computer name with the IP or computer name.


That would be all, Hope you like it and find it useful.Please leave your comments!

What is MD5 Hash ?

 
MD5 Hash Algorithm

In this article, I will tell you about MD5 Hash algorithm.It is a very useful technique for keeping things secret and safe.However it is old but is still very useful.

 So what is this MD5?
       MD5 stands for Message Digest algorithm 5.It is widely used for security purposes and keeping things secret or hidden.It was designed be Ron Rivest in 1991 to replace MD4, another older algorithm.MD5 was an improved version of it.MD5 is a hash generating cryptographic algorithm.

How does it works?

It takes some data as input, the data may be text or binary, and then it generates a fixed length hash value.The input can be of any length but the output will always be of a fixed length.The fixed length is 32 digit hex hash.A diagram will explain it all.
As you see that it doesn't matters how long the input is the output hash will always be 32 digit in hexadecimal.
 Uses of MD5 Hash 
 The hash is very useful for security purposes.For example if you download file from the Internet, or a backup of the data you have created on a server, the file may not be the original one.It could have been tampered by viruses or some bytes might have been missed during the download.
      To check whether you have got the original file you can create the MD5 hash of the original file and save it somewhere.After a long time you would need your backup files, after downloading the files you can create MD5 hash and match it with the original files hash.If it gets matched, then the file is not broken or damaged by any means, if it doesn't the the file will be corrupted.

How to create MD5 Hash of a file?
For Windows, you can use this utility, MD5 summer.Well it works good, but I have another utility which does the job even better.The name is Hash tab.It integrates itself into the properties menu and create a tab File Hashes. It shows different Hashes with different algorithms such as CRC32, MD-5, SHA-1. So you can check the hash and write it somewhere, then make a backup of that file, and when you need it you check its hash and compare it with the original hash value, then you know that it is all good or maybe corrupted.


For Unix you can use the command, md5sum:

for example,
md5 myfiles.rar


you can replace myfiles.rar with the name of your file.


How to create MD5 HASH of text?

Well if you want to send someone a secret message you can take advantage of MD5.Just use this website to generate the MD5 hash of the text you want.Then send it to anybody you want, and then he can convert it back using any MD5 decryptor such as this one.


Nowadays MD5 is replaced by SHA-0, SHA-1 and SHA-2 and also SHA-3 algorithms.Many  algorithms such as CRC32 are also used.

How to break Windows Password?

Note: This article is only for educational purposes .Any mistake might end up in a bad behavior.Do it at your own risk.You, yourself will be responsible for any damage done.

How to Break\Bypass Windows Password?

In this article I will show you how you can break a windows password in case you have forgotten it, or whatever.
     All you need is a an application known as 'Windows Password & Reg editor', and some other stuff listed below:
  1. The software 'Win7 Password&Reg editor'.
  2. An empty CD ( and a CD-Writer), or
  3. A USB flash drive.
So now I will discuss about the features of this software.
  • It can easily manage your password.
  • You can edit your password.
  • You can delete your password
  • You can edit or delete it even without knowing the old password.
  • You don't have to be logged in to this.
  • It has a command line UI ( User Interface ).
  • It supports all versions of Windows, I mean from Windows NT to 8 and maybe it will support later versions.
No need to worry that it has a command line UI, step-by-step procedure is given below.

So, How does it works?, some background information!
 Microsoft's operating system, Windows stores its user's information ( which includes password and some other stuff ) in a file called 'SAM', which does not means 'Surface-to-Air Missiles", it stand for Security Accounts Manager.It is located in \WINDOWS\system32\config\.It is not easily accessible and editable.

OK, now for the procedure.

Procedure

1.) The first step is not easy but not much hard, actually standard users may not understand it.You need to make a bootable CD or USB.
          The software does not changes whether you use a USB or CD, but what I want to tell is that not much computer's BIOS supports booting from a USB drive, but approximately all of them support CD boot.
  • Download the software here.
  • A zip file will be downloaded.Extract it.
  • In the extracted folder, you will get an ISO file named 'cd110511.iso'.
  • For CD just simply burn it , for USB extract it and copy all files (not folder) to your USB drive and follow the next step only for USB.
  • Open command prompt (cmd.exe).Type the following:
                   h:\syslinux.exe -ma h:
Note: Replace h with your USB\CD's drive letter.
After all that, now your USB\CD is ready for boot process.

2.) Now its time for the boot process.
Insert your USB or CD into your computer and then restart it.If it asks automatically to boot from CD\DVD or USB then press any key to continue, or it may even boot without even asking.If it does not asks or boots automatically, go to your BIOS settings and then boot from CD\DVD.As I told earlier not much computers support USB boot.

3.) The first screen will be as below:


Press 'enter' to continue.

4.) In the next screen it will ask you to select the drive in which the Windows is installed.


The drives will be listed with numbers, the name will not be displayed ( C:\ or D:\) you may remember the size of it in MB.Type the number and press 'enter'.If it finds the Windows in it, it will display a success message.It will automatically detect the 'config' folder but will ask for confirmation so if it already written then just press 'enter' otherwise type WINDOWS\system32\config.

5.) After that it will give you a list of account name on the Windows.Type the name of the account you want the password to be removed.After typing it press 'enter' key.


6.) When you press enter key, it will load the SAM file and will ask you that which operation you want to apply on it.Press '1' to edit user data and then press 'enter'.


7.) Now it will display a user edit menu.So if you just want to clear the password, press '1'.If you want to edit\change password press '2', it won't ask for the old password, so you just need to enter the new one.I'm going for clear password.


8.) Now it will display a message which will say 'Password cleared'. Now to exit editing press exclamation mark key '!' to quit editing. Now you will be transfered to user edit menu again. Press 'q' to exit.


9.) Now it will ask you to save the configuration\changes you have made. Press 'y' to save else press 'n'. I'm saving it so I can complete the tutorial. The message will be "Step 4: Writing back changes" , so don't get confused.


10.) Now if anything that you missed, you can do it again, press 'y' for it. Or if your editing has completed press 'n'. Now finally end this session by pressing Ctrl+Alt+Del. Take out the CD\USB, because it is going to restart. Now you will see a change and that is the password is gone( If you have done everything accurately).


Hope you find it useful! And please leave your comments if you like it!.

How to Block advertisements on web?

Block ads with different methods!

Advertisements are a big source of revenue for many websites.But they can be very annoying especially flash ads and pop-ups.So in this article we discuss about how to block advertisement on different browsers such as Firefox, Google chrome, Opera, and Internet explorer.In this article we will use different techniques such as changing setting, using some tweaks, and using some plugins.

                    So what are ads?.An Ad is a form of advertisement on World Wide Web, it is supposed to attract visitors to another website.
      
 There are various types of ads, some of them are:
1) Search engine result page: Ads related to search results are displayed near the results to confuse the user.
2) Floating ads: An Ad which floats or moves here and there across the screen of the user.
3) Expanding ads: An Ad which may change its size or may change the contents of the web page.
4) Polite ads: A technique by which a large ad will be downloaded into smaller pieces.
5) Wallpaper ads: An Ad which changes the background of the page.
6) Trick banner: An Ad that looks like a dialogue box with some buttons, it works by deceiving the user by showing him some kind of error message or like someone is calling him.
7) Pop-up: One of the most annoying one, a new window open in front of the current one displaying an ad.
8) Video ad: An Ad is displayed before the video or during the video is played.
9) Map ads: A piece of text or image which is linked to another site, is displayed over a location in an electronic map such as Google maps or Bing maps.
10) Mobile ads: An SMS sent to a mobile.
11) Superstitial or Flash ads: An animated Flash video or images on a web page similar to TV ads.
  
        OK, to block these ads you may follow the below methods/techniques.

NOTE: The below methods may not block all types of ads listed above.


Contents:

1) Internet Explorer.
2) Opera.
3) Chrome.
4) Firefox.
5) For all web browsers installed( hosts ).


1. Internet Explorer.

Blocking ads on Internet explorer is kind of a complex, but don't worry its not too much complicated.
It is complex because it has no easy to use and free plugins that make it easy to block ads.
      The only good known plugin for Internet explorer in Adblock pro , but it costs $19.95.
So lets move forward.But still it has 2 more plugins that work quit well.

IE7 PRO

             IE7 PRO is a plugin for Internet explorer that works also on 1E8, and 9.It adds a load of features to Internet explorer and one of them is ad blocking.You can download it from the official website, and also check its other features.After installing IE7 Pro you need to manually activate the adblocking feature, because it is disabled by default.Now I just want to give a warning that during the installation of IE7pro, a third party program prompts for its installation, so don't accidentally install it.

I personally don't recommend this, because it is complicated and not much good at blocking ads.

SIMPLE ADBLOCK

        Simple ad block is the second known plug-in for IE that does a little good job.As its name suggests that it is very simple to use , on the other hand there is not much users can do to block/unblock specific ads.
                       It requires only two inputs from the user.
You can download it from the official site.

2. Opera.

          Blocking ads on Opera is just as complicated as on Internet Explorer, or I should say that it was complicated because now after the release Opera 11 , more and more new plug-ins are being introduced for Opera that makes it more easy to block ads.


  Opera adblock

                                     is one such add-on that makes it very easy to block ads, and it is also very easy to install and use, all you need to do is to go to Opera add-on site and install it.Here you go.

It may be easy to block ads with it, but it ain't easy to unblock them.

To unblock ads follow the instructions:
  1. Right click on the website, on which the ads are to be unblocked.
  2. Click on Edit site preferences.
  3. Move to Content tab.
  4. If checked then Uncheck Enable content blocking.
  5. You have to do it for every website, manually.

3. Google Chrome.

Blocking ads in Google chrome is very very easy, as easy as pie.All you need to do is just install a plugin and get started with it.The plugin, I'm talking about is called Adblock.

AdBlock

You can download it here for chrome.It is also available for Safari and Opera. Adblock is just easy to install and setup, and its even more easier to use as it requires nearly zero guidance from you.
   It has many other great features:
  •  Users can manually block an ad that was missed by Adblock, by pressing Ctrl+Shift+K.
  • Users can exclude websites from being blocked , by pressing Ctrl+Shift+L.

4. Firefox.

 Blocking ads in Firefox is easiest then from any other browsers . Firefox has the best of the best plugins in their collection, not only for adblocking but also for many other purposes.
To block ads on Firefox, you just need to use only one plugin.And the name of that plugin is Adblock plus.

AdBlock Plus

Download it here.After installing it on Firefox, Just click on the ad you want to block and its all done.
Unless you unblock the ad manually it will never show its face again.And a little red button will appear on a bar called Ad-on bar, you can manage AdBlock plus there.It will be easy to block/unblock ads with it.


5. For all Web-browsers installed(Win Hosts).

This is my favourite method of ad-blocking. Many people are unaware of this useful file. To understand this method, first you need to understand whats is hosts file and how it works?.The hosts file is a file used by many operating systems to map host names to IP addresses, it is an important file of an OS's Internet protocol.

Here is a preview of hosts file.


Here it is how it works?.The hosts file by default has no extension assigned to it.So you need to open it with Notepad or some other text processing software.The hosts file is loaded into the computer's memory at start up.Windows checks for the entries to web pages.The 127.0.0.1 is considered as your computer's address, so when an entry(listed in hosts) is requested from a browser your Windows thinks that 127.0.0.1 is the address of the entry and is located somewhere in your computer( actually it is not ).So the entry is skipped.The entry could be a website domain such as www.yahoo.com, or www. microsoft.com.By default no such domain is listed in it.
OK, to block ads you need to modify it.You can also block any undesired web pages with it.The procedure is as below.

Procedure:

1) Press Enter key and go to next line.
2) Type the address of your computer that is 127.0.0.1.
3) Give a space.
4) Enter the domain you want to block such as www.anywebsite.com . Or for an ad enter its domain like ad.doubleclick.net.
5) If the domain is not being blocked try it like this, first type it with 'www' and then without 'www'.
      127.0.0.1 www.msn.com
      127.0.0.1 msn.com
6) Close and save it.Restart your browser.

There are billions of ad server, so you need a well organised host file, MVPS hosts file is well known.All you need to do is to(1) download it, or you can use this a better version by Nightmare INC, download it here (2)extract the 'HOSTS' file, no need to look at other files.(3)Replace it with the original hosts file and you are done.Hey! I almost forgot to tell that where the hosts file is located.OK for Windows xp/vista/7 it is located at the address C:\WINDOWS\system 32\drivers\etc\hosts, as I told earlier that it has no extension so open it with notepad.
          For a detail of where the hosts file is located in different OSs see Wikipedia's page here.

It is also important to note that a hosts file is very Important part of on OS especially for security purposes, I mean a virus or worm may modify it.I hope you like it!.
     
  "Without ads, Internet won't be a sea of crap it is these days!"


Note: This article is only for educational purposes .Any mistake might end up in a bad behavior.Do it at your own risk.You, yourself will be responsible for any damage done.

If you like this article then please leave your comments!.